

Watch the video or see the guide below
Style Connections – Understand your wall panel connection based on style you chose:

READ this entire installation guide before beginning your installation
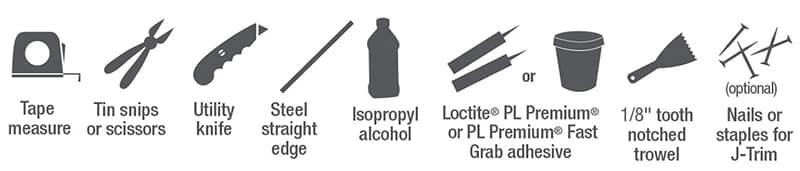
Tools and Items You Will Need:
Preparation
ACP, LLC is not responsible or liable for any labor costs or damaged product incurred as a result of improper installation. All product defects are covered under our 5-year limited warranty.
Due to manufacturing variations, we cannot guarantee an exact color match from lot to lot. Prior to installing Fasade 4×8 wall panels to your wall, please unpackage & lay out all purchased product to ensure color consistency. If you encounter unreasonable color variation, please give us a call at 1-800-434-3750 (7am-4:30pm CST, M-F) so that we may assist you with your project.
Before Installation Begins
- Clean surfaces.
Before starting, make sure all surfaces are clean, dry, smooth and free from dust, grease, wax, etc. Lightly sand any glossy surfaces to remove sheen. Clean the back surface of the panels by wiping with a clean cloth and rubbing alcohol. Refer to adhesive manufacturer’s directions. Use rubbing alcohol in a well-ventilated area away from ignition sources. - Dry layout.
It is recommended you perform a “dry layout” prior to applying any adhesive. Measure walls, check for level, square and plumb. Depending on dimensions and room construction, you may need to trim some panels accordingly or use Corner Divider Trims to hide gaps. Please reference Style Connections lists above to find how to lay your panels:- Butt Together connections: these panels just butt at the seams. See Installation Step 5 for trim options if you desire to cover up seams.
- Bead and Button/Pattern Overlap connections: these styles overlap on their patterns or on the bead and button perimeter.
- Overlap Lip connections: these styles have 1/2″ flat edges. The longer flat edge is the top of the panel and shorter flat edge is the right side of the panel. Arrange all panels this way so additional panels can be added to the top or right side of any panel.
- Cutting the panels.
Measure and cut the panels as needed.
Installation
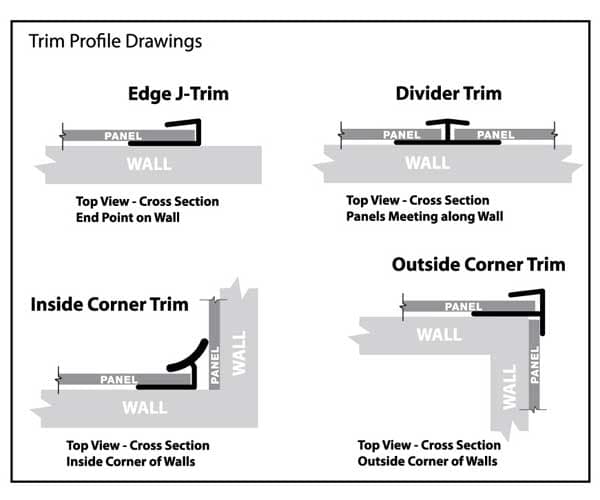
- Installing trim strips (finishing the edges). If the area to be covered ends on a flat wall, and you desire to finish the edges, you can do so by using matching edge J-trim. Also, if you have an inside or outside corner, it is recommended using matching corner trim. You should install the J-trim and corner trims onto your panel before beginning your wall panel installation. See illustrations below.
- Installing your first panel. Clean the back side of each panel using isopropyl alcohol and a paper towel or cloth as described in the Preparation section. Make sure the first panel you intend to install fits. Make any cuts as necessary as described below in the Tips section. Slide trim onto edge of panel. Apply adhesive to the back of the panel and trim. The recommended adhesive is Loctite® PL Premium or Premium Fast Grab. Carefully read and follow adhesive manufacturer’s directions. You can apply panel tube adhesive according to drawing above, using a 1/8″ to 3/16″ bead. The 28 oz. adhesive tube covers approximately 1-1/2 (4′ x 8′) wall panels. Or use tub adhesive. In both cases, we recommend spreading the adhesive out on the panel evenly with a 1/8″ trowel as shown below. As metallic-colored wall panel finishes reflect imperfections, be sure to thinly and evenly spread the adhesive to avoid bumps or glue line telegraphing.

- Squeeze out trapped air. Once your panel is placed, press against the wall using a soft cloth to apply pressure evenly across the panel to squeeze out excess air. Repeat this step for each installed panel. NOTE: For proper panel adhesion, the trowel-on method is recommended. This will prevent any open pockets or bubbles.
- Wipe off excess adhesive. Use water or mineral spirits and a cloth. Clean off any adhesive residue that is visible while it is still wet. Do not allow this residue to dry as it will be very hard to clean up when dry and could damage the finish.
- Install divider trim for butt-jointed panels (optional). To install the divider trim, slide back flange into place under the panel edge and push against the edge. Then slide next panel into it. The divider trim does not need to be attached if you are installing panels with adhesive as recommended.
Installation Tips
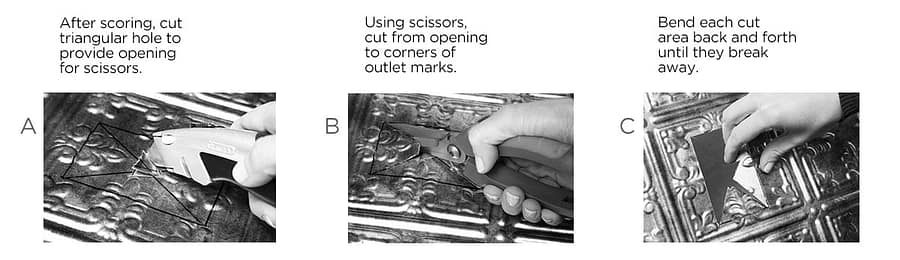
- Cut panels for outlets and light switches. Measure and mark the border of where the opening has to be with a marker. Score along the entire border using a utility knife, making a few passes with a bit more pressure each pass. Then in the center area to be removed, cut a 1/2″ to 1″ triangular hole all the way through the panel. Next, using sharp scissors or tin snips, cut angled cuts from the edges of the cut triangle to the corners of the border scores. Then carefully bend each corner area along the scores until they break free. See illustrations below.
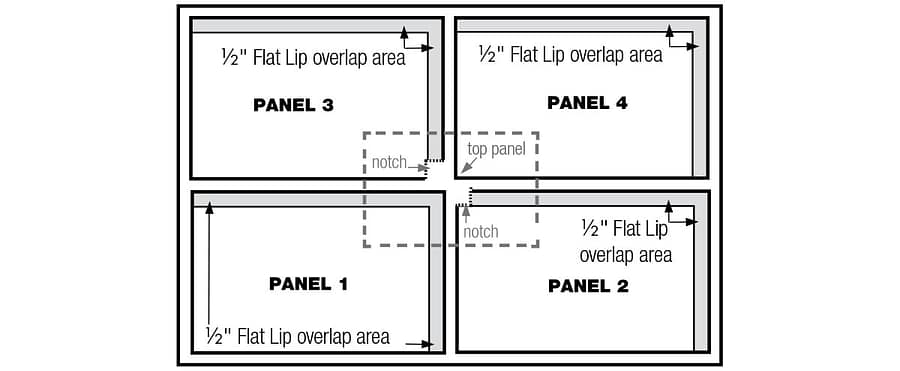
- Overlapping lip panels, where 4 panels intersect. When overlapping 4 panels, it is necessary to cut a 1/2″ notch in panels 2 and 3 to avoid an overlap buildup that causes a “bump.” This is a rare occurrance. Work from bottom left. Start from the left side at the bottom and work either upwards or to the right. An exception to this rule would be designing a layout of panels to be centered at a focal point. If so, build out from both sides of the focal point.
- Clean only with warm, soapy water. Never use abrasive cleaners. Using a high-quality auto polish can help protect the finish.
- To speed up adhesive curing time, lightly spray the adhesive with a fine mist of clean water after applying the Loctite® PL Premium adhesive to the panel.
CAUTION: Even though these panels are “Class A” fire rated, they can be deformed with excessive heat. Never expose to heat over 140ºF. Keep heat sources at least 6-inches from panels.
Never use abrasive materials such as scouring pads to clean surface; use only a soft cloth or sponge with mild soap and water.