

READ this entire installation guide before beginning your installation.
If you have doubts about doing this installation, you should contact a qualified contractor, carpenter or professional installer.
Due to manufacturing variations, we cannot guarantee an exact color match from lot to lot. Prior to installing Great Lakes Tin tiles to your ceiling, please unpackage & lay out all purchased product to ensure color consistency. If you encounter unreasonable color variation, please give us a call at 1-800-434-3750 (7am-4:30pm CST, M-F) so that we may assist you with your project.
ACP, LLC is not responsible or liable for any labor costs or damaged product incurred as a result of improper installation. All product defects are covered under our 5-year limited warranty.
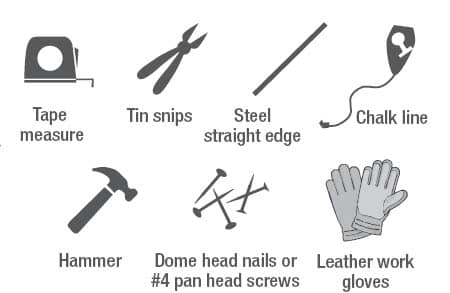
Tools and Items You Will Need:
Preparation
- Surface preparation: This is optional, but highly recommended. Cover the area of your ceiling you intend to cover with tin tiles with OSB or plywood. Make sure the work area is level, flat and smooth. A 1/4″ minimum thickness is recommended. Screw OSB/plywood sheets directly over existing ceiling drywall using 3/4″ drywall screws at about 1-foot on-center. If you choose not to cover your ceiling as recommended, we suggest applying adhesive to the back side of the tile during installation to provide additional holding strength. (Recommended adhesives are PL Premium® or Liquid Nails®.)*
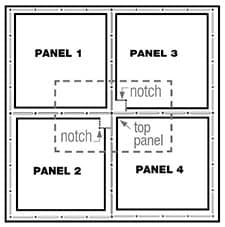
Understand the overlap feature. Prior to installation, it is important to understand the overlap feature of each panel. Each panel has four 3/8″ overlap bead and button edges. When overlapping 4 panels, we suggest cutting a 3/8″ notch in panels 2 and 3 to avoid an overlap buildup that causes a “bump.” (See drawing to right)
- Determine the room layout. Map your ceiling on graph paper before beginning installation. Locate and draw any light fixtures, heating vents, intersecting hallways, closets and doorways. Occasionally these features can influence starting points, tile placement and finished ceiling design. To ensure professional-looking results, the room layout should be balanced with panels centered in the room and equal-size border panels used on opposite sides of the room. To determine what size to cut the border panels in one paralleled direction, see the formula below. Then repeat formula for other parallel direction. Establish your string (or chalk line) at this measurement (see above). These lines should be parallel to the walls and will help you align the first border panels. If your room is out of alignment, adjust accordingly. Measure and cut the border panel to the previously determined size.
- Determine the room layout. Map your ceiling on graph paper before beginning installation. Locate and draw any light fixtures, heating vents, intersecting hallways, closets and doorways. Occasionally these features can influence starting points, tile placement and finished ceiling design. To ensure professional-looking results, the room layout should be balanced with panels centered in the room and equal-size border panels used on opposite sides of the room. To determine what size to cut the border panels in one paralleled direction, see the formula below. Then repeat formula for other parallel direction.
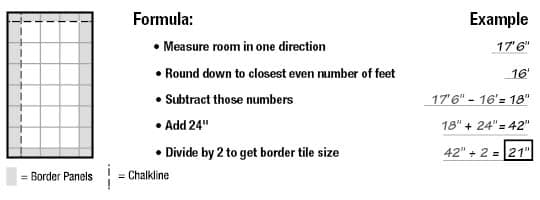
- Establish your string (or chalk line) at this measurement (see above). These lines should be parallel to the walls and will help you align the first border panels. If your room is out of alignment, adjust accordingly. Measure and cut the border panel to the previously determined size.
Installation Tip
Tip: The deep indentations in the Saginaw, Niagara, Toledo, Rochester and Toronto styles prevent them from being cut in the middle properly and are not recommended to be used as a border panel. Accordingly, these styles look best when the Chicago panel style is used on the perimeter of the room. All other styles can be cut and used as a border fill panel.
Installation
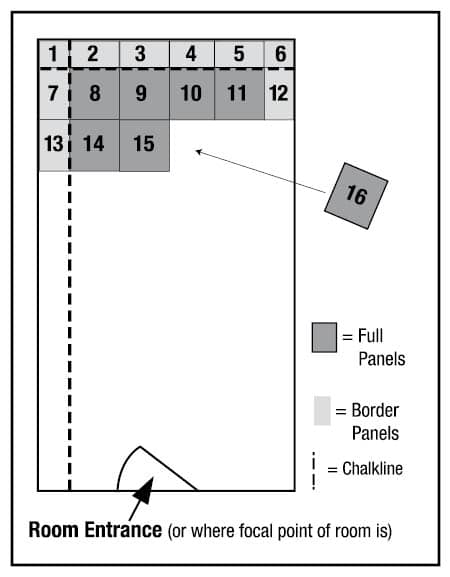
- To install the border panels use the measurement determined previously and measure and cut panel to this size. (Caution: When cutting the tin tile, be careful of sharp edges to avoid injury – wear gloves.) Place the first panel at the corner farthest from the main entrance of the room. This will ensure these items ‘lap away’ from the main entrance, or main viewing area. Nail approximately every 6″ to 12″ around the edge of the panel and in the center where the pattern allows. Hammer carefully to avoid denting the tiles. Note that two sides of the panel cannot be secured until the next tile can be placed underneath. (Tip: Inserting the nails at a slight angle will help increase pullout strength.)
- Overlap the first 3/8″ of the subsequent border panels where the overlaps align and nail as previously noted.
- Working in rows across the room, add panels in order according to diagram to the right and fasten as previously noted. Install the full panels by overlapping each new row over the previous row. Complete each row by cutting and installing the remaining border panels if applicable.
Tips
- If using optional crown molding, start at one corner of the room and install the crown molding around the perimeter of the room.
- Tap any loose seams together with a small piece of wood. If required, fill in any panel seams or crown molding seams with a clear, paintable caulk to create a smooth, tight fit.
- Clean up. Once you have your ceiling installed, the panels can be cleaned with warm, soapy water. Never use abrasive cleaners or anything with chemicals, as these may damage the finish on the panel.
Painting Ceiling Panels
If you choose to paint your metal ceiling, be sure you use an oil-based primer and paint as the steel will rust if a water based product is used. Unfinished steel must be cleaned with wax and grease cleaner before painting.