Read carefully before installation
Tools needed:
- Tape measure
- 4-foot level
- Loctite® PL Premium tube adhesive
- Hammer and 3-penny (1.25-inch) finish nails
OR
- Brad nailer & 1.25-inch brads
- Miter saw
- Safety goggles
ACP, LLC is not responsible or liable for any labor costs or damaged product incurred as a result of improper installation. All product defects are covered under our 5-year limited warranty.
Due to manufacturing variations, we cannot guarantee an exact color match from lot to lot. Prior to installing Rustic Grove wall planks to your walls, please unpackage & lay out all purchased product to ensure color consistency. If you encounter unreasonable color variation, please give us a call at 1-800-434-3750 (7am-4:30pm CST, M-F) so that we may assist you with your project.
Step 1:
Open boxes of wood planking in the room in which it will be installed. Wood must acclimate to the conditions of the room for a minimum of 72 hours. Note: This product cannot to be used in high-humidity areas, or spaces that are not climate-controlled.
Cutting the planks if necessary should be done with a miter saw. Either a manual miter box or powered miter saw work well. (Always follow manufacturers directions)
Step 2:
Before installation, make sure that the surface is clean, flat and dry. If you are installing over a sheetrock wall that is painted a color, we recommend you paint the wall a similar color as the planking to be installed so the wall color will not show through any possible seams between the planks.
Step 3:
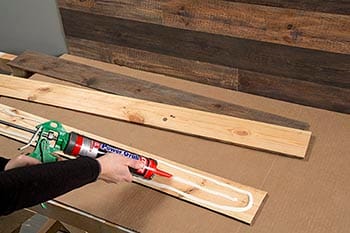
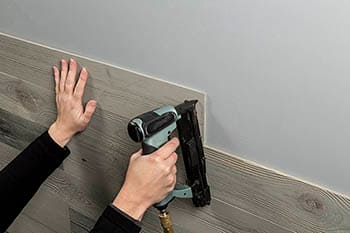
Recommended installation is with Loctite® PL Premium tube adhesive and to be nailed with a brad nail gun or a hammer and finishing nails. Each plank should have a bead of adhesive 1-inch from all outside edges and a single bead applied down the center of the plank (see diagram below). Recommended brad nail length is 1.25-inches. Apply brads/nails approximately 1/2″ from outside edges of planks and into studs when possible (see above diagram). If a brad gun is not available, use 3-penny, 1.25-inch” finish nails along with a nail set to set the nail head slightly below the surface of the plank. It is not recommended to apply wood putty to the nail holes since the putty will collect in the weathered wood grain.
Layout
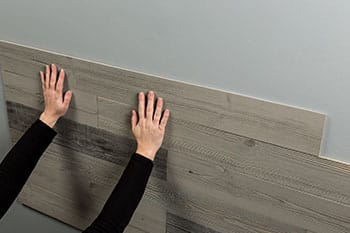
For horizontal board layout
Starting on the floor, draw a level line at 6 from the floor. Next, attach the first plank in the left corner and add construction adhesive to the back of the plank and nail in place (see above instructions). Repeat this process until you reach the right wall cutting the pieces as needed. Stagger the next row of planks over the joints and cut pieces to fit as needed until you reach the ceiling. Finally, add wood trim at the floor to finish your installation, if desired.
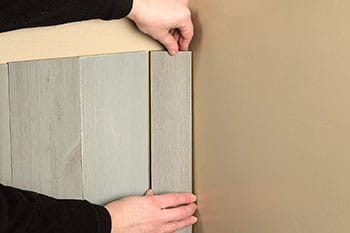
For vertical board layout
Start by finding the center of the wall and mark its location on the floor. Using a level to make it plumb, install the first plank on the wall centered on the mark with construction adhesive and nail in place with a brad gun (see instructions above). Use a level to make sure it is plumb. Next, attach planks on the left and right of first centered plank until you reach the corners of both walls. The width of the final plank at each corner will need to be trimmed to fit.